This blog has now been updated with the release of VUnit 3.0. Please visit the new blog entry.
If you’ve worked on projects where a full UVM test bench was used you’ll probably have appreciated the benefits it gives you. Unfortunately, sometimes it is too much overhead or the project requires testing in VHDL. In this case you may end up writing a basic VHDL test bench and wish you could use some of the nice features from UVM. Luckily you are not alone and you are not the first. Some people have even put together some helpful libraries and frameworks to help you achieve a better test bench in pure VHDL.
VUnit, as the name might suggest, is a unit testing framework. It is open source and supports both VHDL and SystemVerilog. VUnit includes lots of useful features (some of which I’ll look at today), if you find this blog interesting it would be worth checking out their site on GitHub (https://vunit.github.io/).
First it is worth considering what features of UVM we will want for our VHDL based verification project. The high-level aim is to develop a comprehensive test bench comprising of generic modular sections that can be reused but minimising any wasteful overhead. With this in mind, I feel most projects will require at least:
- A method of simply running multiple tests and collating the results.
- A test bench written using transaction level modelling to ensure robust high-level checking.
- A well-structured test bench allowing easy reusability of components and configurability of checking.
Test run/report framework
In addition to HDL libraries, VUnit provides a python framework that allows you to quickly set up an environment where it is easy to run all of your tests. VUnit will parse your top-level testbenches and extract a list of tests that can be run. By default all tests will be run but it is also possible to specify a list of in the form <Library>.<Testbench>.<Test Case> where * wildcards can be used to select multiple tests. For example, you could run with:
python run.py lib.*.test_small*
At the end of the run the tool will output a summary of your results similar to:
==== Summary ============================================
pass lib.tb_example.test_small_random    (0.1 seconds)
pass lib.tb_example.test_small_bug234    (0.1 seconds)
pass lib.tb_example.test_small_myfeature (0.1 seconds)
=========================================================
pass 3 of 3
=========================================================
Total time was 0.3 seconds
Elapsed time was 0.3 seconds
=========================================================
All passed!
Whilst this is a pleasant output, if you are using a tool such as Jenkins for Continuous Integration (CI) testing you’ll be pleased to hear that VUnit also has a simple flag (--xunit-xml test_output.xml) allowing you to create a standard xUnit file which can be parsed by a Jenkins xUnit Plugin. xUnit is a standard format so it should work with many other tools as well.
VUnit additionally gives us the option to add different ‘configs’ in our run.py scriptwhich allows us to run a testbench with different values for generics. Configs offer a great way to verify that a design works in all supported modes, change testbench configurations (such as simulated memory latency) and vary design features such as FIFO depths that can help expose otherwise hard to reach bugs. Each configuration can have custom test names to allow generic values to be easily seen within the reports.
Transaction Level Modelling (TLM)
TLM is a great way to simplify your testbench and reduce the risk of bugs in your test environment. In languages such as SystemVerilog we can use the UVM libraries to have transaction objects that are passed through port objects behind the scenes. My approach to this in pure VHDL is to use the VUnit Communications library’s Message Passing method.
Using the VUnit Com library we can treat the message passing infrastructure like ports in UVM. The mapping between methodologies (although not directly equivalent) is shown below:
| UVM | ⇒ | VUnit Com |
|---|---|---|
| Analysis Port | ⇒ | Publisher/Subscriber Pattern[1] |
| Unidirectional Port | ⇒ | Basic Message Passing[2] |
| Bidirectional Port | ⇒ | Client/Server Pattern[3] |
- https://vunit.github.io/com/user_guide.html#publisher-subscriber-pattern
- https://vunit.github.io/com/user_guide.html#basic-message-passing
- https://vunit.github.io/com/user_guide.html#receiving-a-reply
VUnit’s message passing uses string types, which are passed using functions such as ‘send’ and ‘receive’. We want to pass transactions rather than strings, and will use the VHDL record type to contain each transaction, so how do we send our transactions as string? VUnit provides a method to autogenerate ‘encode()’ and ‘decode()’ functions to translate between our records and their string representations, saving us a lot of recurring effort as transactions change.
Let’s have a look at how some basic patterns in UVM can be translated to VUnit.
Unidirectional Port vs. Basic Message Passing
| Producer | Consumer |
|---|---|
-- create transaction and send variable t : trans_t := new; variable receipt : receipt_t; send(net, find(“consumer”), encode(t), receipt); check_relation(receipt.status = ok); |
-- create actor variable self : actor_t := create(“consumer”); variable message : message_ptr_t; variable t : trans_t; -- receive all the messages loop receive(net, self, message) check_relation(message.status = ok); t := decode(message.payload); end loop; |
First it is worth noting some terminology: an actor is the producer or consumer of a message; a message is a string representation of the data being sent. Actors are created and referenced by a unique name. In the example above the consumer creates a new actor using “consumer” as its unique name, whilst the producer finds this actor using the same unique string (you can imagine that ‘create’ adds an actor to the address book whilst ‘find’ looks up an actor in the address book). You may be wondering, if you’ve looked at the code, what ‘net’ is. This is the network over which the messages are sent. It is defined in the com package and is used in the send and receive functions. You will always use net here.
This basic example highlights some of the main features of message passing in VUnit and differences to UVM. UVM may use a ‘put port’ (a port that allows you to push data from one component to another) to send data to the consumer. This consumer will implement the put function/task which will be called by the producer. A slightly more complex version of this might see the producer doing a ‘put’ to a uvm_tlm_fifo object (a transactional queue or FIFO), whilst the consumer would do a get or peek operation on this same fifo. The VUnit example above has a lot of similarity with this second UVM case.
We can see the producer sends an encoded transaction to “consumer” and checks that it sent ok. The consumer is sitting in an infinite loop where it waits for a new message, checks that the status is ok, and then decodes the transaction from the payload (receive is a blocking call making it is safe to put in a loop). At this point you would normally do something with the transaction. The calls to check_relation (part of the vunit check_library) are not strictly required, but can help detect issues in your testbench and save you effort debugging.
Analysis Port vs. Publisher/Subscriber Pattern
| Producer | Consumer |
|---|---|
-- create actor variable self : actor_t := create(“publisher”); -- create transaction and send variable t : trans_t := new; variable status : status_t; publish(net, self, encode(t), status); check_relation(status = ok); |
-- create actor variable self : actor_t := create(“subscriber”); variable status : status_t; variable message : message_ptr_t; variable t : trans_t; -- subscribe to publisher subscribe(self, find(“publisher”, status) check_relation(status = ok); -- receive all the messages loop receive(net, self, message) check_relation(message.status = ok); t := decode(message.payload); end loop; |
Analysis ports are often used in UVM to allow components such as monitors to broadcast information to any units that are interested in it. This will often include the system scoreboard. In VUnit we have the publish and subscribe/unsubscribe procedures to help us with this. The producer will send messages using the publish command using just the producer’s actor and no destination actor (as it is broadcast). The only difference in the consumer to the previous example is that it must subscribe to the stream before it can receive any messages. Essentially the subscribe command tells the publish command to do a send to the subscriber. The publish procedure will send to all the actors that have previously subscribed. The loop receiving the messages is then the same as in the previous example.
Bidirectional Port vs. Client/Server Pattern
| Producer | Consumer |
|---|---|
-- create actor variable self : actor_t := create(“client”); -- create transaction and send variable t : trans_t := new; variable r : resp_t; variable receipt : receipt_t; variable message : message_ptr_t; -- send transaction send(net, self, server, encode(t), receipt); check_relation(receipt.status = ok); -- receive reply receive_reply(net, self, receipt.id, message); check_relation(receipt.status = ok); r := decode(message.payload); |
-- create actor variable self : actor_t := create(“server”); variable message : message_ptr_t; variable receipt : receipt_t; variable t : trans_t; variable r : resp_t := new; -- receive all the messages loop receive(net, self, message) check_relation(message.status = ok); t := decode(message.payload); // send reply reply(net, self, message.sender, message.id, encode(r), receipt); check_relation(receipt.status = ok); end loop; |
This final example is again similar to the first example. The additions here are the reply and receive_reply procedures. The consumer in this example sends a response to the producer using the sender and ID information from the message. The producer then receives the reply (and will be blocked on receive_reply until there is a reply) using the ID information from the receipt of the original send procedure. If you are only using the reply to send a true/false acknowledgment you can use the acknowledge procedure which takes a boolean instead of a string and a matching receive_reply that receives a boolean.
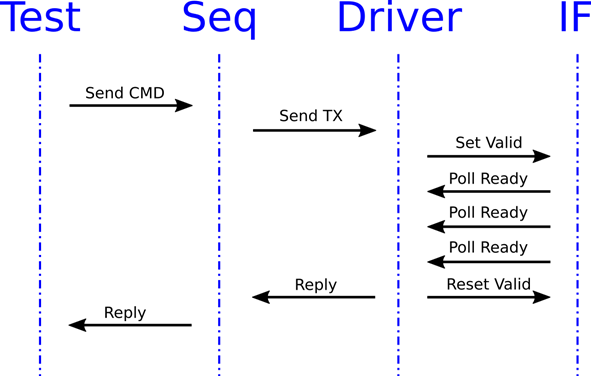
By using the server/client pattern, we can synchronise the different components. As you can see in the adjacent sequence diagram, the driver will only send the reply to the sequence once the transaction has been completely sent on the interface. The sequence in turn will reply to the test only once the entire sequence is complete (in the diagram the sequence only sends a single transaction). For example, if a design has a write interface and a read interface, we may want to ensure the write sequence has completed before starting the read sequence. In this situation we would call receive_reply for the write before sending the read. On the other hand, we can start multiple sequences using send, and then wait for one or more of them to complete using receive_reply.
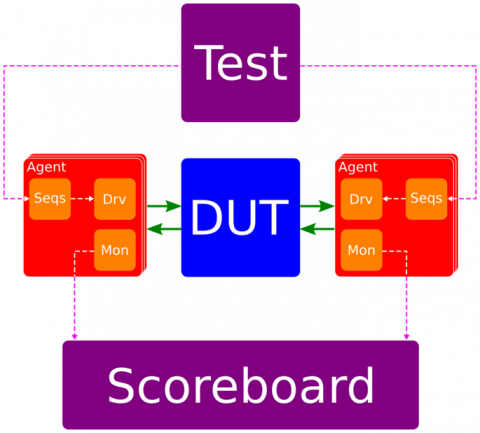
Structured Code / Reusability
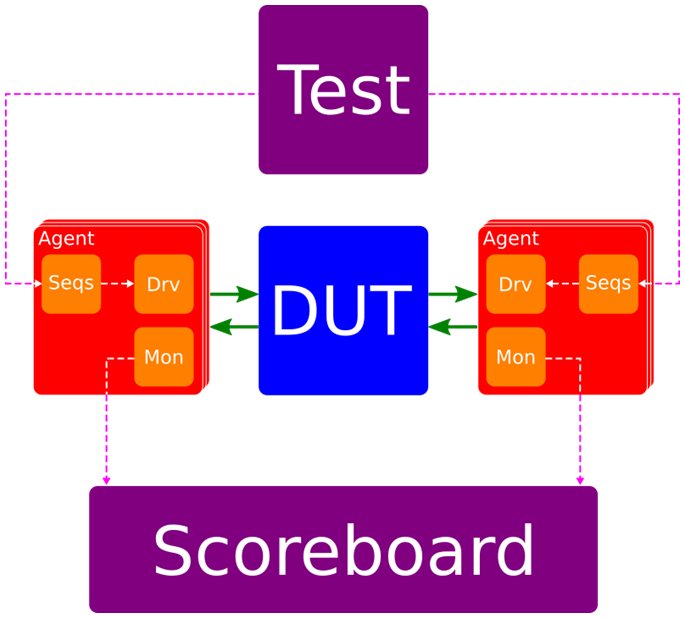
Now that we have transactions being passed as messages, it is much easier to divide up our TB. One of the biggest benefits of a well-structured testbench is reusability. In this instance we will keep all of the interface specific code in the agent as agent and interface will always be reused together. For example, an AXI-Streaming agent may be useful for many designs, whereas the test and scoreboard for the design as a whole will be less reusable. The connections to the agent from the rest of the testbench (the dotted purple lines in the image) can be made using Message Passing, whilst the DUT connections (solid green arrows) are ports out of the agent connected to the DUT ports in the TB top level.
If we have multiple instances of the same agent in a testbench, we will need to be able to reference them uniquely (so that we can send messages to each of them individually). The easiest way is to pass an instance name through a generic in the agent. This name can then be used to create the actor in the sequence allowing the tests to communicate with the sequence. This allows us to instance the same agent in a new test bench without being constrained by the naming while ensuring that each agent creates a unique actor.
When writing a new testbench we can now instance the selection of agents we need, giving each a unique instance name. Next, we can write the tests that will use the server/client pattern above to kick of sequences in each of the agents, using their unique instance name to ‘find’ the actors. The scoreboard can also use the unique instance names, this time to subscribe to the messages from the monitors and using the transactions driven by the master monitors to determine the validity of transactions from the slave monitors. This may seem like a small amount of overhead but it will save time and effort overall as well as producing a more effective and robust testbench.
Conclusion
UVM is an important methodology with a very useful set of libraries in SystemVerilog. We have seen that we can take ideas from this methodology and use the VHDL verification libraries available to create well structure and efficient testbenches. Hopefully this blog will help verification engineers familiar with UVM consider using structured VHDL-only TBs using the VUnit library for simple projects. Or perhaps you might find a new interest in both VUnit and UVM. If you have found this post interesting there is lots of other information about the VUnit libraries on their site: https://vunit.github.io/. Also, I’ve gone through how some of the features relate to the UVM equivalent but if you want to read about message passing without the comparisons, there is a great blog on the VUnit site at Improving VHDL Testbench Design with Message Passing.
In a future blog we will be detailing how we link our design and verification tooling in a Jenkins based Continuous Integration environment. For a preview of our environment you can sign up for interactive demo at smartfpgadesign.co.uk.
To be notified when the blog is available sign up to our Continuous Integration Interest Group

Follow us on Linkedin, Twitter or Facebook to find out about our future blog posts.