
We often work on client projects that use the Linux operating system (OS), either as a desktop operating system or on their embedded system. The core of the Linux operating system is the kernel. In this article we introduce the Linux kernel and a guide on how to compile it for a given architecture.
We will start by focussing this on compiling the kernel for a desktop x86 based machine, to provide an overview to the basic compilation process. In the next blog we will focus on (cross) compiling the kernel for an embedded platform, such as the Beagleboard or a Raspberry Pi.
What is a kernel?
You may already be aware of what a kernel is, but let's revisit it and potentially provide some additional information.
In simple terms, a kernel is the core part of any OS that is responsible for managing system resources, such as the CPU, the system memory, storage and hardware devices. It provides the interfaces that allow user-mode application software, such as word processors, graphics programs and even games to access system resources in a safe, governed, manner.
The Linux kernel uses a monolithic structure, that is, all operating system services (file system, device drivers and virtualisation) run inside kernel space and all user applications (word processor, spreadsheet, ...) run in user space [1]. These user space applications will communicate with the kernel via a defined interface and use this to access the advanced features of the operating system.
There are other types of kernel, such as the microkernel design, that simply provides the raw hardware drivers for the CPU and memory management through the kernel with operating system services, such as filesystem management, specific device drivers and IPC being managed in user space. There is also the hybrid kernel structure, such as that of OS X and Windows, whereby some of the additional operating system code is included in the kernel with the aim of improving performance. Hybrids tend to be modular too, allowing different operating system services to be included in the kernel during the installation of that particular application, through the use of modules.
There are many other types, but these are the main 3 that are used in production systems. There is also the option to run kernel-less, that is, with an application running on bare-metal without a kernel.
Many of the different kernel features can be built into the kernel at build time, however, the Linux kernel also provides a modular infrastructure allowing kernel modules to be inserted into the kernel at runtime to provide support for many different elements, such as, additional devices drivers, for a particular USB device, webcams, display drivers, filesystems.
The Linux kernel provides the Linux kernel API, that is a common application programming interface that allows user space programs to interface with the kernel through a stable system call interface. This API ensures source code portability between the different systems that conform to the same standard. That is, the source should successfully compile and run on any system that conforms to this standard.

What is the Linux kernel?
What is so special about the Linux kernel? Well for a start the Linux kernel is open source, that is, the kernel is freely accessible for everybody, both to access and to run. That is, by going to kernel.org, anyone can download the kernel source code – primarily written in C - for a particular kernel release, to build this code and to execute it on a given hardware platform.
To download this source, one doesn’t need to provide an email address or any contact details, neither does it require any form of payment, it is free to download, updates are free, usage is free.
This doesn’t mean that the kernel is licence free, all who use modify or distribute the kernel must adhere to the rules of the GNU general public licence, version 2 [2].
Building a kernel
Now we know what a kernel is, let's have a look at how to build one. The following outlines the basic process using the traditional method of downloading the kernel from kernel.org and building natively - that is, building it on the same architecture that you intend to run it on.
We refer to this as the traditional method since many Linux distributions use package managers to manage all installed packages on their distros, and as part of this, they will also include kernel source packages that include several modifications specific to this distro. Although the correct way to build and install a kernel would be to follow the distro maintainers instructions, this doesn't always provide a good overview of the kernel build process.
Build dependencies
Since we are building on an Ubuntu based desktop platform, most of the build dependencies are covered by the build-essential package. That said, these dependencies could be installed manually. We require GCC, the GNU compiler collection, which includes a standard C library and compiler, along with Automake. There are a number of other libraries that are also required, and this can vary depending on the build distro and the kernel configuration. For example, in our case we needed the SSL development library, libssl-dev, but this may not be required for everyone.
Downloading the source
We are now ready to start building the kernel. First we need to download the kernel source that we wish to build. The version we choose may depend on several factors, such as looking for improved kernel features or a particular driver released within a particular kernel version. Or it could simply be that we wish to upgrade the existing system kernel. In this instance we have chosen to perform the latter, that is, a slight upgrade to the kernel. We can check the currently running kernel with the uname command as follows:
$ uname -r

4.15.0.20
With this information in mind, we have chosen to download kernel version 4.15.2. The kernel source files can be downloaded using one's preferred web-browser, however, all terminal gurus would see that as cheating, so here we rely on the wget command to fetch the source files - all from the comfort of the command line:
$ wget https://mirrors.edge.kernel.org/pub/linux/kernel/v4.x/linux-4.15.2.tar.gz
$ tar xvf linux-4.15.2.tar.gz
Now we have downloaded and unpacked the kernel we need to configure and build it.
Kernel configuration
The Linux kernel is a complex beast, and as one would expect, there are several options that need to be configured before the kernel is ready for compilation. However, this is greatly simplified by the fact that we are building a native kernel for an already running system, since a copy of the running kernel config can normally be found in the boot partition. Provided this is the case, we simply need to copy this configuration file to the same directory as the kernel source and rename it to '.config' - the default configuration file name used by the kernel make system.
The following command copies and renames the default configuration file
$ cp /boot/config-4.15.0.20 .config
Although the kernel version of this configuration file does not match ours exactly, since both kernels are the same major version, there should no problems with this. However, since the release of this kernel, there could be several changes to the configuration options within the newer kernel, and so we need to update these to ensure they are compatible with the kernel we are trying to build. There are two ways to address this:
- make silentoldconfig
- "silentoldconfig" will process the configuration options and ask the user to update any new options available. Warning this can be quite time consuming if a large number of options have been added to the kernel.
- make olddefconfig
- "olddefconfig" processes the configuration options and accepts default values for all the new options.
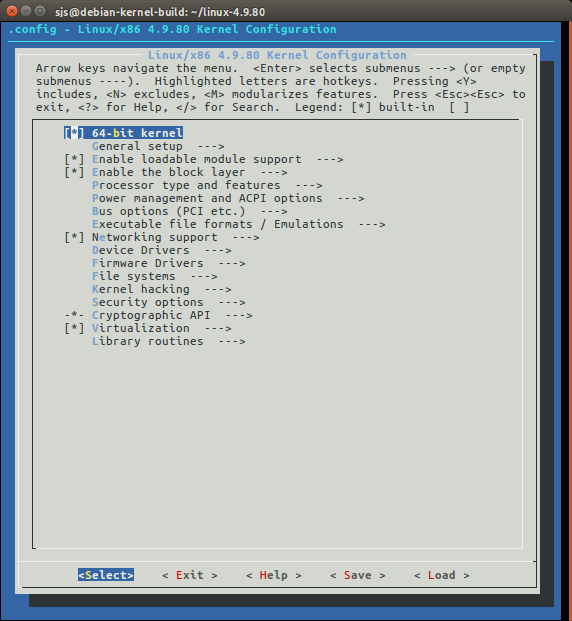
If you’ve never seen it before, it is definitely worth having a poke around the kernel configuration anyway. This can be done using a simple text editor and opening the .config file, however, for a true kernel experience we need to invoke the ncurses kernel config editor known as menuconfig, with:
$ make menuconfig
menuconfig provides a menu driven interface to search and configure the various kernel options, however the search feature is renowned for not being user friendly.
Kicking off a build
Once the configuration is complete, it is now time to start a kernel build. The simplest way to do this is to run:
$ make
followed by:
$ make modules
this will build the main kernel binary along with the kernel modules.
Installing/running the kernel
Once the build has succeeded, we can install the kernel and kernel modules with the following commands:
Note: this must be done as a superuser.
$ sudo make modules_install
$ sudo make install
The 'make install' command should also update the grub configuration with the newer kernel details allowing this to be booted. The grub bootloader menu provides the option to select which kernel to boot if the default is not preferred.
Once this is complete, reboot the machine and you should be running your shiny new kernel. This can be confirmed with the uname command as follows:
$ uname -r

4.15.2
Should there be any problems with this newer kernel, you should be able to revert back to the old kernel by selecting the previous kernel through the grub bootloader menu at boot time.
This article has provided an introduction to the Linux kernel, how to choose and download a new kernel, how to build it and finally how to select your new kernel at boot time.
In a follow up article we will look into building the Linux kernel for an embedded system, for example a Beagleboard or Raspberry Pi developers board.
To be notified when the article is available subscribe to our Embedded Linux Interest Group.
How ITDev Can Help
As a provider of software and electronics design services, we are often working with the Linux and Android operating systems. We have extensive experience in developing, modifying, building, debugging and bring up of these operating systems be it for new developments or working with existing kernels to demonstrate new device technologies and features.
We offer advice and assistance to companies considering to use or already using Linux or Android on their embedded system. Initial discussions are always free of charge, so if you have any questions, or would like to find out more, we would be delighted to speak to you. If you are interested in attending a workshop on embedded Linux/Android, or receiving more information on this topic, please sign up to Embedded Linux Interest Group.
References
1. https://en.wikipedia.org/wiki/User_space
2. GNU general public licence, version 2 https://www.gnu.org/licenses/old-licenses/gpl-2.0.en.html, or read the COPYING file found in the base directory of any kernel source download.
Follow us on Linkedin, Twitter or Facebook to find out about our future blog posts containing information on Embedded Linux Development.