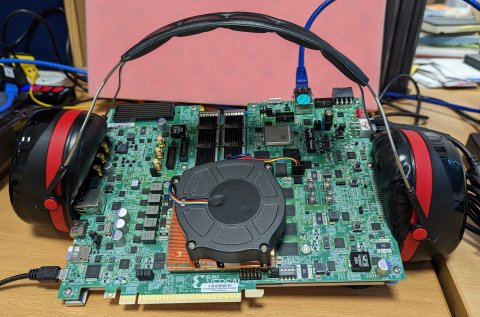
For one of our current client projects we have been developing on a pair of AMD Versal VPK120 development boards.
The VPK120 is loud. When you turn it on you will know about it, as will everyone else in the same room.
Similar in volume to a server at boot, the VPK120 fan needs shutting down to a reasonable level as step one in any project.
There are two ways to control the fan speed, either through the Versal FPGA itself or via the System Controller Zynq chip that is also present on the dev board.
While there may be advantages to getting the fan speed run directly by the Versal device, there is not an out the box solution that I’m aware of, especially if a designer is not looking to use an OS such as Linux on the Arm cores. This would therefore necessitate that any designer writes their own software / FPGA code to modulate the fan speeds and read the fan’s tach data. Not something you probably want to do, as it is taking away valuable time from the actual project development phase.
Fortunately, AMD has somewhat catered for this scenario in that the System Controller can manage the fan speed and doing the work for you, and while the configuration is relatively easy to set up, there is a decent amount of one-off board pre-configuration that needs to happen as the board does not currently ship with the latest System Controller software.
The rest of this blog is a guide showing how to set up the System Controller, and how to offload the fan control from the Versal device to the System Controller. Newer board revisions may come pre-shipped with the correct Controller software, which will allow for some of the beginning stages to be skipped.
Most of the information below can be found here on AMD's wiki on Versal Evaluation Board - System Controller however it is somewhat scattered in places, and this blog aims to consolidate it into a series of logical steps to follow.
Step 0 – Disconnect Fan Header?
If you are in a busy location, you won’t want the fan on for longer than necessary, for this upgrade process the fan header can probably be removed from the board without issue. In a climate-controlled room at 22 – 23oC SYSMON reports FPGA temperatures not exceeding 50oC after being powered up but unprogrammed for an hour. From this I would say it is likely fine to have the board fan disconnected while performing these updates if needed, however, I would absolutely not run the boards without the fan connected if there is anything programmed to, or running on the device. (Do this step at your own risk!)
Step 1 – Determine Current System Controller Interface and Set it to the BEAM Tool
AMD currently has two interfaces for connected to the System Controller, the legacy BoardUI framework (host application) and the new BEAM tool (web interface). The BEAM tool is set to replace the BoardUI, however it is not currently enabled when devices are shipped. We need to see If it is enabled (or enable it if not) and determine the web address to connect to.
Ensure the System Controller boot mode switches (SW11) are set to QSPI32 (On, OFF, ON, ON), and JTAG mode is set to FTDI JTAG (SW3) (OFF, ON) – These should both be the default settings.
Connect the micro-USB JTAG cable to the bottom left of the board (USB-C on VPK180) and open a serial connection to the highest port number of the 3 that have appeared (115200 baud). Connect an ethernet cable to the System Controller ethernet port (top right VPK120, bottom right VPK180), and connect it to a network with DHCP and a PC.
Boot the device.
If the BEAM tool is enabled, then the last message from the boot should look like the following:
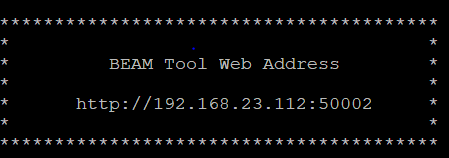
With the address as set by HDCP, if you don’t have DHCP then the message will say no IP address set, it is possible to assign a static IP, by logging into the device over serial (more on this later) and running ifconfig (see the AMD wiki for more on this).
If you do not get his message, then you are set to BoardUI mode and need to change over. Type:
ext <return><tab>
into the session and you will get a login prompt, type in:
petalinux
If typing doesn’t seem to do anything you may need to reconnect the USB lead and restart the session as the input buffer occasionally seems to go unresponsive.
Type the following commands to enable the BEAM tool:
sudo su
systemctl enable scwebrun
systemctl disable start_boardframework
Then reboot the board.
Step 2 - Determine Current System Controller Linux version and Boot file version and upgrade if necessary
Use Step 1 to determine the current IP address / port of the BEAM tool and go to it:

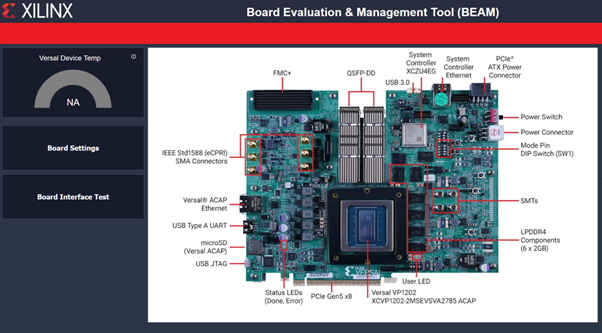
Click “Test the board” on the right.
If this image appears, note the N/A under Versal device temp, then the System Controller requires updating to support temperature measurements:
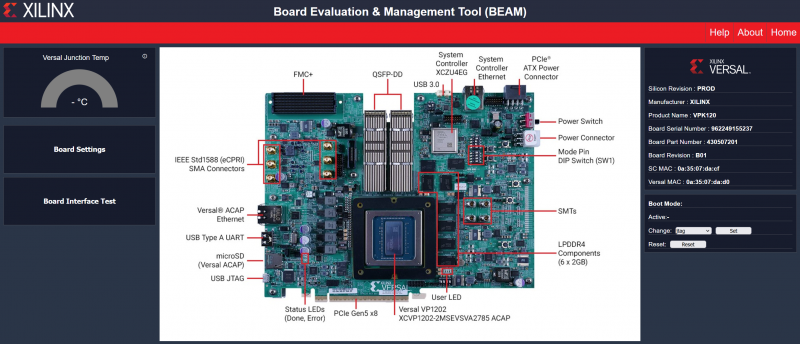
If this image appears, note the "- oC", then the System Controller supports temperature measurements, and the devices just need configuring (you can skip to the next blog).
If an upgrade is needed, then it’s likely that both the Linux image and the boot file need upgrading.
To see the current boot file, look at the very first lines of the UART output when booting the System Controller:

This version shipped with our boards was 2022.1, at least 2022.2 is required for the fan controller software.
Get the latest Boot and Linux images from the AMD wiki, and extract the Linux image to a .wic file.
To upgrade the System Controller, set a static IP on your host PC of 192.168.0.1 and connect it directly to the System Controller’s ethernet port.
Hold down SW16 (System Controller FWUEN pushbutton) and set a browser to point to 192.168.0.111, choose the boot file and select image B:
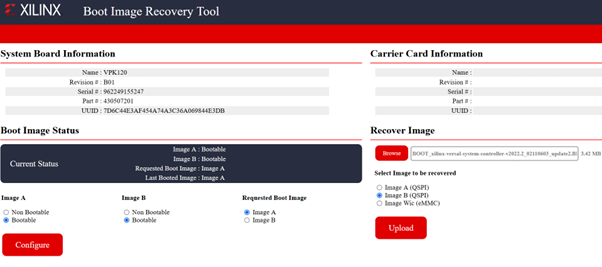
Upload
Once complete the requested boot image should have changed to B (if not select it and press configure), then reboot the device.
Note the Boot loader has changed to 2022.2:

Power off the device once this has been confirmed.
Now we need to upgrade the main Linux image, again holding SW16, boot the device and return to the recovery tool window.
Select your Linux image, and upload it to the Image Wic slot:
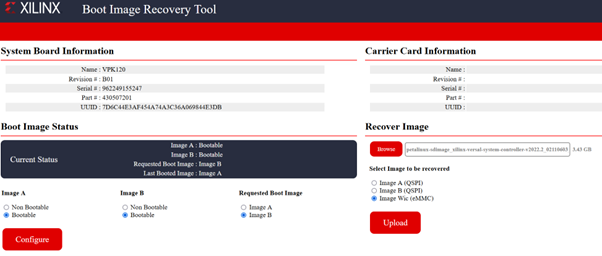
Upload this (it will take a while).
Once update has completed, reboot the board and check the kernel version.
Before upgrade:

After upgrade:

This completes the board update and need only be completed once, if at all.
In the next blog I will go into the steps of setting up the board which will be project specific.
Note: References to Xilinx have been updated with AMD in line with their branding transition.
How ITDev can help you
This blog article is just one small demonstration of how we keep clients informed: documenting the steps required to reproduce the same set-up as we used.
We can assist you in achieving your goal and solving your problem.
- There will be open, frequent communication as we look to understand your aims.
- In-line with your needs, you will be kept up to date on progress.
- Appropriate knowledge transfer activities will occur throughout the project.
If you have any questions or would like to find out how we can help you with your product development journey, initial discussions are always free of charge. We would be delighted to speak to you so please contact us.